Posted on Leave a comment

World Space Week

“The General Assembly declares 4 to 10 October World Space Week to celebrate each year at the international level the contributions of space science and technology to the betterment of the human condition”

UN General Assembly resolution, 6 December 1999

What is World Space Week?

World Space Week is an international celebration of all things SPACE. It is the largest space event on Earth with a proud claim to more than 5,000 events celebrated in over 80 countries across the World! It even has its own dedicated website: https://www.worldspaceweek.org/ and a board of directors that help to ensure that there is a whole heap of resources available to help make the most of this extraordinary, cosmic event.


How do we get involved?

World Space Week encourages and supports ANYONE to create space education and outreach events.

With so many organisations, educators and families getting involved, it is an amazing opportunity to come together as a community of interested individuals to arrange and participate in such a large scale event. There's no strict rules about what you should be doing, as long as its space themed then its a celebration.

Check with your local council and clubs if there is an event near you. Many places of interest, such as parks, woodlands, museums, theme parks and public spaces with visitor centers etc often run events, especially for children and families so its worth looking around for any events that they may be holding. Everyone can get involved, schools, clubs and organisations, but if you can't find an activity that is happening near you, why not plan your own?

Any space related activity will do, from a drawing activity to big group quiz. You can create your own crosswords or write a story about your trip to the Moon! Build a space den, create an experiment, eat some space food... There are so many free resources available on the internet... all you have to do is explore the possibilities!

What did we do?

Well, as I am sure you may have guessed, we did not want to be left out of the Space Party!

So, we got our heads together and decided to do a Glowtopia Space Week event. Now, we had every intention of building a rocket, but honestly, we just didn't have enough cardboard to build a vessel we could all fit inside! We thought about trying to make our own miniature moon, creating a model solar system or even a life size planetarium... but in the end, the little people at Glowtopia outvoted us all.... and so fancy dress day it was!

And yes, you guessed it... if Glowtopia are doing a Space Week fancy dress day, it's going to be glowing!

Well, we were already off to a flying start with our Alien Eyes Headbands! We couldn't exactly have a space themed dress up and leave those out of the equation. I thought it would be a great idea to make the kiddies' heads the alien, and then have their bodies as the space...  The kids decided they HAD to have the Light Up Crazy Hair (it seems all aliens have a squiggly, coloured, tentacle type things spilling from their head!) that was easy...

Obviously it wasn't enough lights! We picked up some metallic star, planet and alien stickers, and the kids had great fun sticking them all over their black tops and trousers, but to make sure they really stood out, we had to get some "dazzling" stars on there too... So, we went and got our LED micro lights and wrapped them around them T-Shirts. If you do this at home, please be careful! DO NOT wrap the light strings anywhere near the neck area, we wrapped ours in an X around the front and back going over the shoulder and under the arms so as not to move around and get caught up. DO NOT leave children unattended while wearing the string lights!

Now that we had finished with our space outfit, Alien eyes and Alien hair, it was just the facepaint left to go. We copied the eyes from the headbands on the eyes of the kids, making wide white circles on the whole eye area, and with their eyes closed we painted coordinating coloured pupils and iris to match. We painted an alien body shaped design over half of the face in colours that matched the headbands, gave a few space spots to the aliens, and painted little white alien claw feet (a bit like a crab).

Nope.... still not enough! So we added some highlights with our UV Neon face paint and used our new chunky glitters to add a bit of detail to the faces and just like that, with the speed of light (well not quite) we have 3 mega little martians ready to celebrate World Space Week!

We really hope you join in the fun this World Space Week.... and beyond!

Whatever you do, wherever you go, take that giant leap for mankind and always reach for the stars!

Posted on Leave a comment

How to wear Neon – funk up your look for the ultimate fashion trend and party wear guide

In case you missed it, early 2019 fashion trends saw a massive revival of the 1980s Neon fashion statement with high street clothing retailers adding bright bold accessories and clothing lines to liven up the winter days and long nights. Of all the 80s fashion trends, it is undoubtedly the neon craze which left an unrivaled imprint on us back in the day, and throughout the decades as seen in all our 80s style cos play and themed dress ups. It has remained a staple statement for all rave wear, hen parties and charity dress ups and has continued to make an appearance in sportswear ever since, but this year it has made a come back on the catwalk and on the streets and doesn’t seem to be waning anytime soon.

So, we wanted to get a head as we move into Autumn with our brand new neon range of clothing accessories – and what better way to launch the range then with some top tips on how to wear neon to rock your look with a fresh new vibe.

Our Top 5 Tips to a contemporary Neon Style

  1. Add a Splash of Colour!

    If you’re looking to follow the bright and bold neon trend but don’t know where to start, or you are a bit reluctant to incorporate a dramatic overhaul of your core wardrobe, we recommend adding a little bit of neon drama with a striking accessory (or 5)!  Go with a neon accessory for a bright statement piece to stand out against your neutral outfit. We love a neon oversized bag, clutch or purse to compliment your look whether you’re adding a pop to your daytime outfit or going for the wow factor on your evening attire. And when you’re feeling a bit braver, pair it with some chunky neon costume jewellery, a hot wide neon belt and either killer heels or funky pumps in matching neon shades against your monochrome or neutral outfit.

2. Suit Up with Sass!

Whether you are looking to stand out at work or you want to liven up your formal occasion with the neon edge, we think that a neon suit will be making waves. An oversized blazer, or a wide leg pant suit in stunning pink, blue or orange will get you noticed combining chic with sass for a striking combination. Worn with a simple white vest or blouse will not over-complicate the look, but if you’re not quite ready for such a dramatic statement, you can add a little bit of drama to your white, black or grey two piece with a bright neon blouse or vest, a neon scarf and neon stilettos or block heels.


3. Be Bold with block colours

Your neon wardrobe will have a more dominating feel when you go for block colours without patterns. If you’re feeling bold treat yourself to blazers, blouses and bottoms in single neon colours that can be mixed together with other neon shades for a colour blocked look, or wear with muted and neutral colours in your closet to add a punch of colour to your look.

We love neon wide leg trousers, cosy coats, and bright blouses paired with black for a chic, polished look which is ideal for the office or a night out on the town.

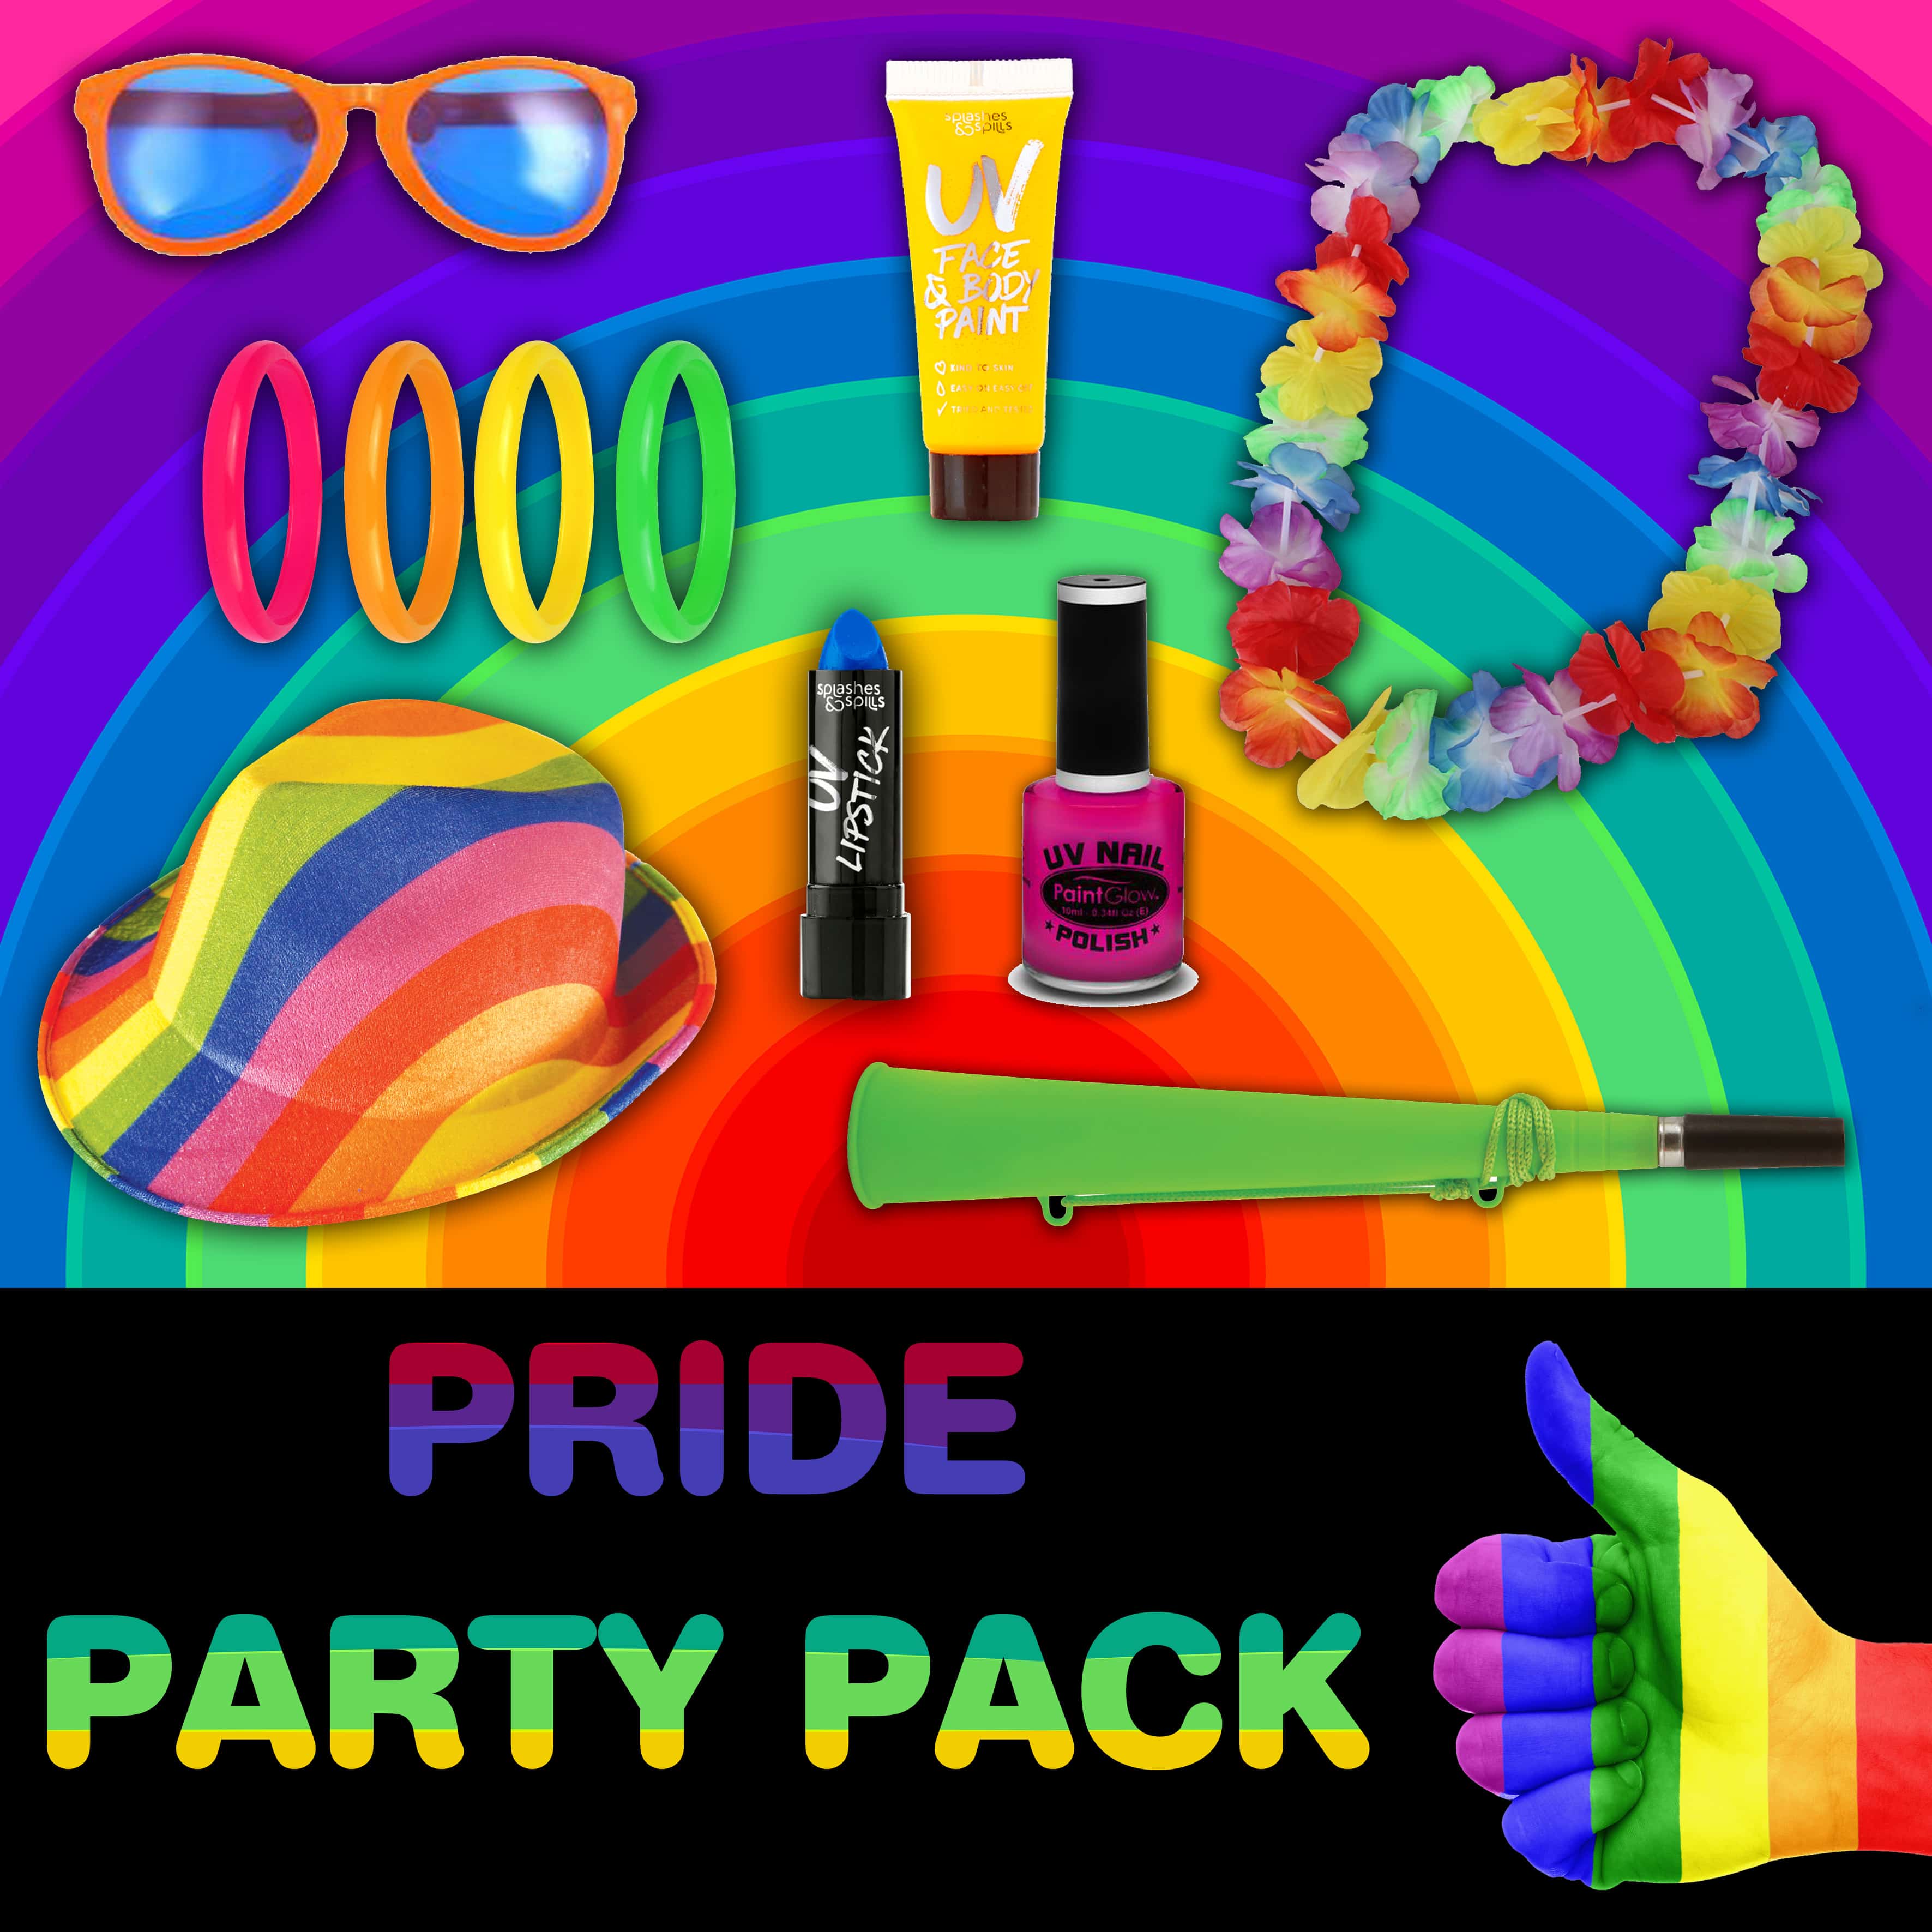
4. Inject colour in your make up routine.

The Makeup Look of 2019 trending on Instagram is neon green eye shadow. Until earlier this year, the “no makeup makeup” was the hottest trend but now we are ready to inject some colour, and inspired by the neon dress code a range of hot neon photos and tutorials are filling up our news feeds.

To really get the look right, you need to focus on your eyes. Keep your skin dewy and natural, and give your eyes the attention they deserve with blended neon shading on the eyelids fanning out with a fading glow across the brow and even framing the cheekbones, complimented with a striking eyeliner in contrasting colour. We have found that a lot of the neon eyeshadow shades are just not strong enough to give the bold colour we like, so we have opted for UV neon paint sticks. These apply in dense, bold colours that can also be blended to a fade giving the perfect cosmetic design that is streaming right now, and not only do they give an intense look in normal light, when you’re out in clubs and bars with UV and black lights the effect is outstanding.

For a daytime look, swap the big bold eye makeup for a simple neon lipstick in pink or orange shades, and for a big night out where only the hottest look to get your noticed is called for, combine both neon eyes and lips in coordinating colours which compliment or contrast with your neon outfit.

5. Party like an 80s throwback!

No top tip list for how to wear neon would be complete if we didn’t include how to rock your neon party look. Whether you are rocking the rave scene, pumping the party, hustling the hen night or funking up a “Flashdance” fancy dress outfit, and you’re wondering what to wear then read on. Neon is the perfect get up for a glow party, black light party, or when you just want to stand out under the nightclub UVs. Generally, the more colour you can add to your outfit the better, and a multitude of accessories are a must – less is definitely not more! If you can, go for a bright neon background colour to your outfit, like fluorescent yellow or green and then pile on the accessories from there. If you can’t find a hot outfit in those colours, go for white – it will give you an all over glow so you can bust out some shapes that will still be seen in the dark. For the accessories, think bold. Boys look great with a sharp neon hat, braces and neon socks and pumps, and the ultimate get up for girls has got to be a neon tutu with fishnets and legwarmers. For girls, if you’re not brave enough to team up your tiny tutu with fishnet tights, opt for leggings and wear fishnet gloves instead. Depending on the occasion you can team your tutu with neon block heels and legwarmers. If a group of you are hitting the town try to coordinate your outfits together for a polished group ensemble.

However you decide to get your neon on this Autumn/Fall, we hope you find our tips helpful to ensure your look radiates wherever you are.

Posted on Leave a comment

Glowtopia’s Guide to Surviving the Summer Holidays!

For most of us, we are almost approaching the half way point of the long School Summer Holiday break. Many of us would have packed our bags and had our Summer vacation as soon as the children break up from school, and the rest of us are either still waiting for the big holiday or trying to keep sane while saving the pennies for a holiday later in the year or beyond. Whatever your situation, as we get half way through there's always that burden of running out of ideas to keep the kids occupied, or finding the cost of taking time off work, childcare and keeping them entertained is starting to eat away at the funds and our rationality.

Here at Glowtopia, we have put together some fun, free and cost effective tips and tricks to get you through the second half of the holidays. We couldn't help to add a glowing twist to some of the ideas, because.... well that's just what we do.... and we figured that if you are working in the day, it will give you some ideas of things to do when it starts to get dark.


Top Tip 1. Plan it all!!

I strongly recommend you print out a planner for the holidays and stick it to the fridge or pin it on the notice board for all the family to see. It takes so much pressure off the holidays if everyone can see what days things are planned and what days are "pyjama days", "chill days" or "home days". If the kids are in holiday clubs or you have to work, put those dates on there too, as well as the fun stuff. It helps everyone to adjust to the lack of routine and it will give focus for counting down to all the days out you do have planned.

That said, you can take it a little further.... Whether you are taking the kids and the dog for a walk, or you're packing up for a week's camping, take a little time out to plan ways to make it a bit special. Obviously, if its a holiday, the level of planning is going to resemble a military operation, but if you're just taking the kids to the park, put it on the planner and discuss with them before you go on ways to make it more of an adventure. Can you meet up with friends? Can you bring things with you? Maybe organise a couple of activities such as a bug hunt, treasure hunt, or simple family games like "What's the time, Mr Wolf". You'll be amazed at how much fun you can have if everyone contributes to the ideas and builds a little anticipation for fun, family bonding before you go. It also actually helps to teach children some important life skills such as prioritising, making arrangments, time-keeping and if you're planning as part of a group, it also teaches them how to compromise!

Top Tip 2. Embrace the Boredom!

Yep - I am serious!

Aside from the fact that teaching the little people that the bank of mum and dad isn't an infinite pot of money and there is a limit to the days out and expenses that one can afford over the Summer, it is actually quite good for small people in other ways too. If managed well, when children get bored it can open the mind to opportunities to fill that empty time with something creative and imaginative. So first up, make your family a boredom jar - it really couldn't be any easier.

All you need is an empty jar, any jar or container will do, and sit down with the family to make a list of some jobs and activities. I used lolly sticks from a craft store when I made my first boredom jar as it was easier for little hands to pull out a stick, but now we write our tasks on a piece of paper, fold them and pop them inside the jar. Our boredom busters include activities for indoors and outdoors - from lego challenges, story writing and singing.... but also chores and jobs like cleaning their room, sweeping the floor and feeding the fish. If you click on the pictures below, you'll find links to our favourite templates on Pinterest!

And whilst I fully sympathise with the parental pains that accompanies those endless cries of "I'm bored!" there is plenty of evidence that being bored has its benefits for children (check out this article). Being bored will actively trigger the imagination to try and fill that empty space in time. So even though it may sound as though the siblings are going to argue for an eternity, or the tantrums and whining may feel like it's spiraling to a new level, their creativity and imagination will (eventually) kick in and will teach them a bit about resourcefulness and how to entertain themselves - a really important ability for growing minds and for fostering a healthy attitude to different situations.

Top Tip 3. Build a Den

All kids love building dens, and with so many possibilities, its such a versatile activity for all the family.

You can plan a trip to the woods, many of which like the National Trust Parks run den building sessions, or you can search online for den building tips before you go. If there's an abundance of large sticks and branches you can build a den that you can get in yourself, but if you can only find little sticks and twigs, build a hedgehog house instead.

If you're stuck indoors on a rainy day you can create a den in a bedroom or even on the sofa using blankets, sheets and pillows. Give your den a theme such as a reading den, games den or movie den, or if you're feeling really adventurous, make it a sleepover den and bring a friend. It's a great family bonding activity for afternoons and evenings if you have had to work during the day and want to spend some quality time with the kids.

If you have the supplies, you can always make a den in the garden. A tent would work well, but don't let it stop you if you don't have one. You can use tarpaulin, blankets (if you don't mind them getting damp overnight), play tents or really get to grips with the DIY and build one from scratch like this tutorial from the Eden Project.

And if we're talking dens, well the best time to get the most out of your garden or indoor den is when it starts to get dark... and the best thing for dens in the dark has got to be some glowing stuff! It doesn't matter what stuff, but as long it glows you will keep the kids occupied for hours.

Our ultimate favourite den must have has got to be our Interactive Glow Pillows - if any home accessory was made for camping, dens and sleepovers it has to be this!! All dens need a comfy pillow, but with a dual purpose, glowing aspect that you can create your own games and designs on, you won't regret treating the kids. Play tic tac toe, draw pictures and write secret messages that will glow and fade so you can start again.

If you have any glow sticks floating around, you can use these to make an ambient light source that you can hang inside the den. If you're using a tent, tie some to the guide lines so they can be easily seen. You can also stake a few sticks around the outside so it can be easily seen. They are lovely when you pop one in an empty jar to make a decoration for the den. You can use LED string lights to drape around the outside and hang inside the tent to add some gorgeous illuminated decorations too! We also love colour changing LED lamps - they also release a beautiful, calming ambient light which changes colour automatically. They make perfect night lights so they are ideal for sleepovers in a den, but if you wanted to it to feel a bit more traditional and old fashioned, you could use LED candles instead, they do look beautiful!

Top Tip 4. Go Outside

We all know the British weather has its ups and downs, but one of the best things to do with the kids is go to outside. Whether it will be sitting in the garden, taking a stroll, or getting to the beach, it really is important. Check out your local on What's On Guide, local newspaper and those little family magazines that usually turn up on your doorstep or in your child's school bag near the end of term.

There are generally lots of free activities you can join in with in your local community. There may be local fun days, council funded events such as firework displays and Summer sports for all events. You can find volunteer groups that will go on conservation activities such as litter picking or park and pond care, which is an excellent opportunity for educating children in a community spirited and fun way. If you search the internet you'll certainly find free, downloadable bug hunt packs, bird watching tick sheets, foraging and exploring ideas and outdoor crafts, but if getting about is a problem, there are garden activities you can do together, whether that be adapting the park ideas on a smaller scale, playing games, having a picnic, creating a vegetable patch or even some messy play and a paddling pool. The main thing is getting outdoors in the fresh air and giving the little people a break from TV screens and devices. It's good for the health and the mind, and you'll be thankful when the kids go back to school that you spent that time with them. We love Glow in the Dark games and there's lots of ideas where you can adapt your favourite games and add a glowing spin such as Glow in the Dark Hoopla (using glow stick), Light Up Tennis (using LED balls), Glow Ker-Plunk, Glow Bowling and many more! (Check out Pinterest for inspiration)

Top Tip 5. Make Memories that will last a lifetime!

We never forget our best holidays, and the Summer Holidays are so long there's always so much excitement, but when we get back to the normal school routines those memories can quickly fade. So this Summer, make a conscious effort to talk about the holidays and things you have done. Ask the children to keep a diary and to write about the best things they have done and why. Not only will this give them something to look back on and makes a special keepsake in their childhood memory boxes, but its also a good, practical way to keep their minds active and continue the writing practices that they do at school so they can hit the new school year running. Take lots of photos and collect lots of little keepsakes and treasures from your adventures, and then on those rainy days you can print the pictures and make family collages and a photo montage of the holiday, and make a memory box to store all the little valuables.

So whether you are going abroad, having a staycation, or enjoying the comfort of your home surroundings this Summer, fill it with as much fun and family time as you can, and make those special memories that you will always look back on in years to come with a smile.

Happy Holidays to you all, from all of us here at Glowtopia!

Posted on Leave a comment

It’s A PRIDE thing!

Party with PRIDE and radiate in RAINBOW

Check out our radical range of rainbow coloured adornments. From get up gear to awesome accessories, bold body paints to wonderous wands - be proud and loud with Glowtopia!

PRIDE PARY PACKS ON SALE!

Our radiant rainbow coloured accessory pack contains the ultimate essentials you need to celebrate with chromatic charisma!

Only £9.99 (saving over 30%)

BRAND NEW!! RAINBOW PRIDE GANGSTER HAT

Brand new and just for Pride we have stocked this funky fedora to bring the rainbow to the rally.
From £2.60

Pride Rainbow Whistle Get yourself heard at any Pride Parade with our pretty Pride whistle! Available in Purple, Blue, Green, Yellow, Orange and Red As low as £0.65

Pride Headband & Wristband Set The perfect sporty accessory for those hot Summer marches. You'll be keeping your cool in the heat of the parade when wearing this fabulous fashion piece! As low as £2.85

Check out our PREMIUM PRIDE LEI FLOWER GARLAND Especially for Pride in the LGBT colours and iridescent sheen, these deluxe quality garlands will add a touch of the luxurious to your rainbow coloured costume. As Low As £0.82

Posted on Leave a comment

Giveaway Competition!!

You could win a Festival Glow Pack worth £26.50!!!

It's so simple to be in with a chance to win.....

We want to share the glow this Summer, and what better way than to run a little freebie giveaway just in time for the school Summer holidays and some pretty big festivals and camping adventures!

Our Festival Glow Pack is an ideal package for the August bank holiday, Summer Camp, Kids' Clubs and of course.... Festivals! But even if you're having a "Staycation" this Summer, this party pack is still a great bit of fun for adults and kids - why not build a den or camp in the garden and enjoy glowing family fun at home.

It's super simple to be in with a chance of winning...

1. Like Our Facebook page:
https://www.facebook.com/glowtopia/

2. SHARE this competition post on our facebook page

3. TAG 3 friends

Pack contains:

  • 10x 12″ Mega Glow Batons
  • 4x Glow Caps
  • 4x Glow Glasses Connectors (each use 2x Glow Bracelets)
  • 100x Glow Bracelets
  • 2x UV Paint Sticks

On 23rd July 2019 at midday we will select one winner at random and announce it on our page. The winner will be tagged in the post and we will send you a direct message to get your delivery details. We will even cover the cost of postage and packaging!

GOOD LUCK!!
From everyone at team Glowtopia!

Posted on Leave a comment

GLOW for Pride!

Gay Pride is a world-wide celebration of colour with street marches, dancing, rainbow coloured outfits, and a whole load of fun in honour of social and self acceptance, the LGBT achievements, the evolution of legal rights and of course... a show of PRIDE! What started out as a demonstration of human rights almost 50 years ago, has grown and gained momentum all across the western world with many Gay Pride Parades now promoted as a tourist event. These parades such as Brighton and London City attract over 300,000 people each year, and can proudly boast that they boost the local economy as well as supporting many charities and trusts. With this many people in attendance Pride Parades have evolved from a Parade into a Festival with a Carnival-like atmosphere, often including Concerts, Beer stands, Food traders, Barbeques, Sports and Games, with activities for families and a welcoming vibe of inclusion for everyone.

But behind all the glitter and extravagance there is a historical significance to the parade.

The 1960s were not welcoming times for LGBT (Lesbian, Gay, Bisexual and Transgender). It was illegal to display ‘homosexuality’ in public, for people of the same sex to dance together and people were forbidden from selling alcohol to gay people.

A Bar in New York City had set itself up as a place for LGBT people to go and completely be themselves without the risk of being arrested! However because the Bar was operating without a liqueur license, in 1969 it was raided by the New York City police. One lady was hit over the head by a police officer, resulting in a gathering crowd which grew larger until eventually it turned into a full blown riot, in which 13 people were arrested.

Police officers came from all over the city to help control the riot, they managed to disperse the crowd and control the situation. However this wasn’t the end, merely the beginning. The following six days, demonstrations continued to take place outside the Bar, with thousands of people showing up to express their solidarity.

This was a breaking point for the LGBT community, a group of activists pleaded to the Easter Regional Conference of Homophile Organizations (ERCHO) in Philadelphia to allow them to hold a march to commemorate the one year anniversary of the raid. The proposal was for an annual march with no dress code or age restrictions. The plea had been accepted, and the activists began planning their march.

Word spread, and San Francisco decided to commemorate the riot, by holding their own march in which 30 people attended. Since then, word has spread worldwide, with not only major cities, but towns now holding their own march. The march has now turned from a walk through the streets to a full blown festival; Pride festival, celebrating, raising awareness and campaigning for the freedom to allow the LGBT community to live their lives on a genuinely equal footing.

In 2016, 1 million people took to the streets of San Francisco to attend the Pride Festival.

For a full summary of the History of Gay Pride have a read; How Activists Plotted the First Gay Pride Parades.

Gay Pride Festivals across the UK begin as early as February, with the majority of parades taking place between June and August, and continuing until the end of September. We have the biggest Pride Festival in Dorset next weekend 12th - 14th July in Bournemouth! https://bournefree.co.uk/

So what are you waiting for? Cover yourself in body paint, grab some rainbow Pride Accessories and get yourself down to your next local Gay Pride Festival!

To find out how you can get involved with your local Gay Pride Festival; head on over to Pink UK.

To find out more about this year's San Francisco festival read the San Francisco Chronicle's review here. 

Check out this footage:

https://sanfrancisco.cbslocal.com/video/4115449-san-francisco-pride-parade-2019-segment-17/


We’ve also created a Pinterest Board to give you some inspiration and ideas on how you can get your bright and colourful Pride Glow this year!

Posted on Leave a comment

Party Bag Discount Offer!

Thanks for your Feedback! You spoke.... we listened.

Your feedback is super important to us, so when you tell us something, we are all ears!

Our lovely customers asked for our party bag fillers to be all in one place to make it easier to browse, and so a few newsletters ago we shared the link to our new Party Bag Fillers category. You were right! Our little loot items have been flying out the warehouse ever since, so as another thank you, we want to give you money off any party bag fillers you purchase for the rest of 2019!!

Posted on 1 Comment

Party Selfie Stations & Photo Booth Props

Let your guests glow and your photos flash with our LED light up accessories!

Planning a party always begins with endless lists of what you want... from food options to playlists and everything in between. One thing is for sure, whatever party you're planning: wedding reception; engagement or anniversary celebration; hen do; stag do; big birthday bash; for adults or children; you will want to have as many photos as possible to remember it.

Some years ago, at every wedding and big celebration you could find a disposable camera on every table with a request to the guests to snap away. Things have progressed since, and now at many parties you'll have the opportunity to take advantage of a photo booth service, with many suppliers offering a wide range of package options to suit your event. And whilst I've seen many different types of booths for weddings and birthdays from walk in photo machines with digital backgrounds and automatic photo settings to lavishly set up backdrops with an on-hand photographer, I haven't actually seen any with the added wow factor of light up accessories. Well... not until I planned a party myself that is....

A photo booth may be a "must have" for your party, or it could be on the "maybe" list if budget is a concern, but it needn't be as big of an expense as you think. If you're going with the rental booth, I would strongly recommend asking to see their props first, or finding out if you have to or can supply your own... maybe suggest supplying your own for a discount so you can get the personalised and quality props you're looking for. I remember the first photo booth I saw at a party had a tattered feather boa, squashed cowboy hats and broken oversized glasses; it really disappointed the birthday girl and the guests.

But if your budget can't quite stretch to a rented and manned photo booth, you could always invest a little bit of time and creativity into making a DIY photo booth, or if you want an even simpler option, you could go for a selfie station.

When I organised a surprise party I set up a selfie station using a range of items from our Photo Booth & Selfie Station Props. I created a sign so people knew what it was for, and then left people to have fun with the props. The Facebook tags were absolutely amazing and now the birthday boy has many memories to look back on, certainly things he missed while he was trying to get round to all the guests that had come to celebrate.

Selfie stations are similar to the photo booth, but there is considerably less faff. You only really need to budget for the props and any accessories you want to display them in. The possibilities are endless, and it doesn't have to cost much at all. If you're planning a beach themed wedding for example, you could set up a beach towel, some spades, and have your selfie props displayed in buckets. If you are going for a vintage theme, an old suitcase or trunk would be ideal. Baring in mind that a selfie is usually somewhere between one and a handful of people all tightly packed together, you wouldn't need to stage an extravagant backdrop either, so the set up would be pretty simple.

Your guests will be managing their own photos, so this has to be the easiest option all round. Just remember to give your station a designated area and make a sign telling your guests what it is and what to do with the photos (i.e. tag you on facebook, upload to instagram, send them via Whatsapp etc). You are welcome to use our free downloadable signs. Last tip... make sure you grab your friends for photos and everyone will soon follow suit.

Props, Props, Props!!!

Once you've decided on your photo booth or self station, whether you've picked a package or designed your own, you'll need to think about what your props are going to be. The only light up props I've seen at a party photo booth were the ones I brought with me, so I'm sure you'll be setting a new trend and wowing your guests if you include some flashing novelties for them to dress up in. That's not to say you should over do the lights, a good selection of accessories to wear and hold, LED and not, are going to make a lasting impression and provide a whole load of fun for you and your guests. Variety is everything, so you will want to offer quite a few options; the more variety you offer, the more unique combinations your photos will have.

Consider whether you are looking to theme your party booth, for example: vintage, gangster and molls, neon and rave etc, or whether you want to have a random and eclectic mix of silly and sensible that people can just dig in and get snapping. Like I've recommended in other posts, check out Pinterest to see what other people are doing to get some inspiration. If you decide to go with a rented booth, you can just skip on down to my top suggestions for accessories. If you're going down the DIY route, keep reading...

For a DIY Photo booth, you do not need to spend a fortune. The most important thing is having a camera, ipad etc with a timer feature and preferably a tripod or stand so that everyone who wants to be in the picture can be, without leaving one person out to press the button or asking the nearest person to take your picture for you. If you hop on over for a quick look at our Pinterest saved board: https://www.pinterest.co.uk/GlowtopiaUK/glowtopias-favourite-photo-booth-posts/ we have saved our favourite ideas, instructables, tips and tricks for creating your own photo booths and selfie stations, so you'll find plenty of ideas to help from Polaroids to iPads to traditional cameras.

The backdrop for your booth can be as extravagant or as simple as you want. Some of the prettiest effects I have seen are simple voile curtain panels with fairy lights - from simple micro lights to twinkling, coloured or shaped string lights; and they look absolutely stunning set up outside in a gazebo or even just hanging from a large tree, so you don't have to stick to an indoor booth. You could make some paper or artificial flower decorations such as garlands, wreaths and pom poms, position the booth around a door or window which you can dress with string lights, flowers or other themed props. For vintage parties you could add a beautiful chair, some large vintage picture frames which you can pick up for a bargain in a charity shop or boot sale, and present your props from a vintage suitcase.  If you're going for a real party vibe, go for neon backdrops and bright and colourful lights and props. The cheapest and funkiest idea we've seen is picking up different coloured plastic table cloths and using them to make a rainbow backdrop, but we also love UV paint splats on black paper or vinyl rolls, neon poster prints, neon signs and frames painted in UV and neon colours.

We recommend you check out this amazing blog : https://junebugweddings.com/wedding-blog/7-tips-creating-seriously-fun-diy-photo-booth/ for the best tips complete with lots of photos to inspire you.

junebugweddings.com

Happy snapping for your big party photo opportunities, whatever you decide to do. We hope you have lots of fun and make lots of lasting memories.

Posted on Leave a comment

Wedding Glow Stick Wonders

How to "Let Love Glow" Glowtopia Style....

Glow Sticks are literally gathering whirlwind momentum at weddings right now. It is big business in the U.S and now it has landed on British soil. This popular craze is largely thanks to the super value of large quantities of glow sticks, the versatility of the product, and the simple fact that they are lots of fun for adults and children - who doesn't love to crack a glow stick? There are so many ways you can incorporate Glow Sticks into the special day, from wedding favours to waving send offs, but whatever you want to with your glow sticks, we think these magical little light sticks deserve their very own space to glow.... "The Glow Stick Bar".

There are so many ideas floating around on the internet, and the best of them can be found on Pinterest. If you decide to do a little bit of research into the idea, take a look at our Pinterest Boards, and check out our favourite Pins in the Illuminated Weddings Board https://www.pinterest.co.uk/GlowtopiaUK/boards/. In the meantime, we have put together this blog to give you a bit of inspiration and provide you with some free downloads so you can make the most of your Glow Sticks for a truly wonderous wedding.


8 inch Glow Stick Wedding Favours & Frame

If you're thinking about putting out some glow sticks for your guests and wanted to display them on tables for guest favours, why not dress them in their very own labels and impress your guests with the added detail? For this quick, easy and cost effective table favour, which looks pretty awesome, all you need is a whole bunch of 8 inch glow sticks, a vase or jar, a 6 x 4 inch photo frame and our free Vintage Heart downloads.

If you click on the adjacent image, you will open up a pdf file containing 6 labels, ready for you to personalise with the names of the bridal party and date should you wish, or use them as they are. Simply cut out each design, in the shape of a heart or in a square, and cut 2 slits at the top and bottom. Thread a glow stick through each label, and we recommend popping a connector on one end of stick so they are ready to go,  and then arrange in a vase to display in the centre of the tables.

By clicking on the last image, you will open a 6 x 4 inch jpeg - perfectly sized for ready made frames, and we just love vintage style frames with this design. You can hand write the bridal party names and the date if you wish, and this sign will perfectly match your glow sticks.

If you have Photoshop or another photo editing software, you can add the details in text format, then print onto card stock or photo paper. Position the frame in front of the vase display and it will look amazing. If Glow Stick wedding favours were not what you had in mind, these also look great on the evening buffet table, a candy cart, along the drinks bar or on outside tables on a veranda or garden terrace.

Light up the Night Glow Stick Sign and labels

If you are looking for a presentation idea for your glow sticks, we absolutely love the idea of a Glow Stick Bar! Over the last 5 years, Candy Carts and Candy Buffets have been the biggest thing in wedding and party trends, but an illuminating layout of glowing accessories is now sweeping across weddings everywhere. We anticipate this too will become a favourite fad that will stand the test of time; as they are fun and funky, great value and they delight both adults and children alike. Best kept to the evening reception, get your glow sticks ready for when all the formality of the day is done and everyone is ready to let loose and turn down the lights. Your evening party, dance floor, and even the venue gardens and terraces will be aglow with brightly lit guests. And the best thing is you can coordinate the colours of your glow sticks to match your wedding theme if you didn't want to go with a rainbow coloured selection.

How many jars and labels you will need depends on just how many accessories you want to share with your guests.... less is definitely not more in the realms of Glow Stick Bars - the best bars we have seen online have several jars and vases with a range of options for your guests to choose from. If budget is an issue, you can certainly offer a smaller variety, but always buy bulk packs instead of individually wrapped, as the cost is significantly less and they look more attractive in the display.

After working out your glow novelty quantities (we will give you some guidance below) you will need to get a 5x7 inch frame, and download the adjacent jpeg image to pop inside.

The first glow stick you need on your shopping list is the super versatile Glow Stick Bracelet! You'll need to grab yourself a tube (or a few), we sell ours in tubes of 100, and work out how many you will need. As a general rule of thumb we would suggest that if you had 50 guests going, you would want them to have 2 to 3 bracelets each. You'd need 2 tubes of glow stick bracelets, but fear not, we have plans for the 50 or so that are left over.

You will need to print off our label template by clicking any of the adjacent images. Then stick them on to a selection of vases, jam jars, mason jars, plant pots... or whatever you want to use to display your glow stuff to match your wedding theme. We've seen some really cool, alternative displays such as buckets for beach weddings, baskets and planters for rustic weddings, and jam jars decorated with vintage lace and ribbon for vintage and shabby chic displays. For the bracelets, pop a connector on one end of each stick and present them in the vase.

With your 50 left over glow sticks, you can have 25 pairs of Glow Stick Glasses for your Glow Stick Bar. We assume that not everyone will want to wear glasses so if you have 50 guests, supplying enough glasses for half the guests will be absolutely fine if you are on a budget, alternatively you can adjust the numbers of your Glow Stick Bracelets. You will need 2x Glow Stick Bracelets and 1 x Glow Glasses Connector or 1 x Glow Heart Glasses Connector to make up a single pair of glasses. So if, for example, you wanted 50 pairs of Glow Stick Glasses, you would need 1 x tube of 8inch Glow Stick Bracelets and 50 x Glow Stick Connectors. Arrange them together in a vase or jar and attach our Glow Glasses label. We think having two jars (or multiples of 2 jars) for the glasses, offering both hearts and standard glasses looks the best.

Our Glow Stick Necklaces are a one piece wonder. They are 22 inches long and come complete with their own connector. Just like the bracelets, you just need to pop a connector on one end of the glow stick, and present them in a tall vase. Tall vases or even jars (like the tall pasta ones) are really a must for this one, because these necklaces may crack if knocked and smaller jars may topple over. Again, we've got the labelled covered in our free template.

Our final label is for "Glow Sticks". If you only want to offer one option, we recommend buying the bulk packs of our most popular 6 inch Premium Glow Sticks. These come bagged in 25s and offer the best quality glow. Each glow stick comes fitted with it's own connector to attach the included lanyards. For 50 guests we would recommend getting 2 packs because everyone will want one of these!! However, if you want to offer a selection, we also stock 4 inch Regular Glow Sticks in packs of 25 and 12 inch Premium Mega Glow Sticks in tubes of 10s. Why not buy a selection of all 3 and display in different sized jars or vases? If you are on a budget, we have the perfect cost effective option. Our 6 inch Regular Glow Sticks will offer you a bright glow for the best value, and they also have their own connectors and lanyards, and are also supplied in packs of 25. You could even team up the 6 inch Regular Glow Sticks with the 4 inch Regular Glow Sticks, for example 25 of each for 50 guests, to keep the costs even lower!

Personalise Your Glow Sticks

Whether you go for Glow Stick favours or a Glow Stick Bar, you can give your glow sticks the personal touch with your own special message or dedication uniquely designed and printed for you. Here at Glowtopia, we will work with you to create your own custom made template, and we can either heat press or use our special transfer printing to each glow stick. Not only will your glow sticks be unique to you, but they make a special momento for your wedding memory box, and your guest will be affectionately impressed at the detail and sentiment.

You can find out more about our personalised glow sticks here, or take a quick look here at all our branded products. We recommend the 6 inch Premium Glow Sticks, 12 inch Premium Mega Glow Glow Sticks and our Premium Glow Stick Candles for personalisations - and remember, we will design your message for you, and can match with most themes and typefaces to compliment the rest of your wedding stationary.

Glow Stick Send Off

Our final Glow Stick wedding wonder is the simply stunning send off. Its a wonderful way to wave the wedding party along as they embark on their new life together.... and it looks absolutely amazing in the photos! Don't take our word for it, hop on over to our Pinterest Illuminated Wedding Board and see for yourself.

Probably the most simplest but most effective of all the glow stick ideas - all you need is enough Glow Stick Necklaces for your guests, we supply these in a range of colour options in tubes of 50, a large vase strategically placed near to where the happy couple will be leaving the venue, a 10x8 frame and a print out of our send off template!

Top Tips!!

  1. DO NOT SNAP AND ACTIVATE THE STICKS IN ADVANCE! Half the fun of glow sticks is in the snap, and you will want the glow to last as long as possible so however you intend to use or display your glow sticks, leave that bit for the guests.
  2. When cutting the slits in 8 inch glow stick labels, for best results use a scalpel or craft blade. If you don't have one available, lightly fold the label in half on the vertical, and make a small snip at the fold with scissors.
Posted on Leave a comment

Chinese New Year 2019 – Year of the Pig

2019 is the year of the Pig, the twelfth and last sign of the Chinese Zodiac. Legend has it, that the Pig arrived late to the Jade Emperor's Party because he overslept, and therefore was placed last in the Zodiac.

The Year of the Pig begins on the 5th January 2019 and marks the start of the Chinese Spring Festival which ends on February 19th. The Pig is a symbol of wealth and fortune (those chubby little faces give it away), and those born in the year of the Pig are said to be warm-hearted, good-tempered, loyal and honest... albeit a bit lazy at times! Your lucky colours are gold and yellow and your lucky numbers are 2, 5 and 8. But be aware, your unlucky colours are red, blue and green.

Whether you're born in the year of the Pig, or you are planning to hold your own festivities to mark the start of the Chinese New Year Spring Festival, have a quick read through of our ideas of things to make, do, show and glow. So if you were waiting for an excuse to make some crafty stuff (with or without the little people), or want an excuse to go crazy with the take away at your local Chinese, and a party seems like the one then read on!

Chinese Paper Lanterns

This one is super easy and a perfect craft for kids. With a little grown up detailing and embellishment they can also look pretty cool for grown up dinner parties too.

All you need is some card or paper, scissors and either glue, sticky tape or even a stapler... that's it! To add some GLOW power, you'll also need either glow sticks or an LED tea light. Obviously being the year of the Pig, you'll want to bring some luck into the makings, so either get some yellow or gold paper or card, or decorate a white or black sheet with yellow paints, pens, embellishments - we love gold marker pens and fine liners to make chinese letterings, but for a real splurge go for gold origami papers or craft / scrapbook papers, both available in a wide variety of plain or patterned designs, textures and finishes.

With your chosen paper and scissors at the ready, cut a 1/2 strip from the short end of the paper for the handle.

Fold the paper in half along the long edge - you want to have a horizontal fold line in the middle of the lantern once it is put together - and keeping the scissors at the folded edge cut along the folded paper towards the open edges, evenly spaced and leaving approximately 1/2 inch uncut at either end. How you space the splits depends on the look you want and the size of the paper - the more slits the more light shines through, but they will be less sturdy. Use a pen and a ruler if you want it to be symmetrical.

Open the piece of paper, and apply some glue or tape to one of the short edges where the slits end, curl the paper around and join to the opposite short edge. If using a stapler simply staple at the top and bottom after making the curl.

Attach the handle by placing one end of the strip inside the top of lantern, curling it over, and attaching it to the other side of the top of the lantern - again using glue, sticky tape or staples.

And that's it, a super simple lantern.

For a standing lantern, use an LED tea light and place the lantern over it - please do not use real candles, they are a fire risk!
If you are hanging the lanterns and still want the glow, all you need is some 4 inch or 6 inch glow sticks. Cut the included lanyard to size, make a hole where each handle is attached to the lantern, and thread the lanyard through the holes. Cut the length and tie with a knot to keep it in place. If you were already using a stapler or sticky tape, you could also attach the lanyard thread with these.


Chinese Tea Light Holders

Another quick and easy decoration for the home or garden and suitable for both adults and children are coloured tea light holders. They are cost effective and make really pretty table centrepieces and ornamental decorations for lots of events.

The simplest version is the Paper Bag Lantern - Super popular for outdoor events and weddings and all you need are paper bags and LED tea lights or glow sticks. If you want to get an extra Chinese New Year spin on them you only need a few simple craft supplies to transform them.

For kids, we quite like the idea of using pink paper bags like loot/party bags in pink, and drawing (or if you are super committed, try cutting out) a pig design. Alternatively, buy yellow paper bags and write the Chinese symbols for "Happy New Year" or "Pig" in black felt tip pen. If you are happy to stick with the plain white paper bags, you can decorate them with paints, tissue paper, pens and decorative punches, or leave them plain and pop in a pink or yellow glow stick instead.

Next you can cut out simple star shapes from card or paper - again we like yellow the best, and using a bit of double sided sticky tape, attach the stars to glitter LED tea lights to make a super quick but effective tea light decoration.

Lastly, if you want to put a little bit more time into the crafting, get yourself some yellow or gold tissue paper, PVA glue and up-cycle some jam jars. Tear the tissue paper into rough square pieces and glue to the inside of the clean jars. Pop in your LED tea light or glow stick and you have a pretty lucky coloured tea light holder. We like to add a bit more sparkle and detail to our tea light jars, so we added a gold glitter glue detail to the rim and added the Chinese symbol for Pig to the outside.


Glow Piggy Glasses

We love crafting up ideas for unique ways to use our Glow Sticks and Glow Stick Novelties, and we are especially pleased with our Piggy Power Glow Stick Glasses.

This is a really simple craft idea for kids that they will absolute love! All you need is a pair of Pink Glow Stick Glasses, pink paper or card, black marker pen and sticky tape.

Using your sticky tape as a template, draw a circle on the pink paper or card. Cut out the circle and draw two oval shapes in black pen. Activate the glow sticks and assemble the glasses. Finally, using the sticky tape, attach the paper snout to the glasses, and you have a pigging perfect pair of piggy glowing glasses!!


Origami Piggy Glow Stick Wands

No Chinese New Year celebrations would be complete without a little bit of Origami. So we got our heads together to try and think of some ways we can make an Origami Piggy glow.... and well we are pretty impressed with our resulting Origami Piggy Glow Stick Wand! But if wafting wands isn't really on your agenda this Chinese New Year, fear not, we think these are pretty spectacular when used for flower pics and balloon sticks.... or forget the holding stick and pop a glow stick in the body and use it as a little light decoration.

Depending on your creativity, skill and age level, there are a lots of different designs you can go for. We loved this free standing pig posted by wikihow; the steps include photos and videos, its not too complicated and it looks awesome!

https://www.wikihow.com/Make-an-Origami-Pig 

Once you've made your Origami pig, all you need is a glow stick of your choice and attach it into the underside opening with sticky tape - you can use 12 inch Premium Mega Glow Sticks for a sturdy, long lasting superior glow, or if you're on a budget or making these for a class of children, our 8 inch Glow Stick Bracelets are a great cost effective alternative. To make the Origami Pig Light, we just used a 6 inch Premium Glow Stick, but you could use our 4 inch Glow Sticks instead depending on the size of your finished folded pig.

Light Up Balloon Pigs

The last idea we had make for great decorations for the kids.

We took our ILooms Pink LED Balloons and our Premium Neon Pink UV Balloons to make these ultra cool illuminated balloons.

Its so easy.... just inflate the balloons and draw on a cute pig face, pig chinese lettering or whatever pig designs you can imagine. That's it!

We hope you have enjoyed this Blog, and most importantly we hope that you enjoy the celebrations.

Happy Chinese New Year from the team at Glowtopia!